Step One: Getting Started (Again)
Okay, we looked at getting connected to our server via the RDP Admin client.
So, we’re presuming we have our domain and SQL Server and SharePoint farm already running. and we’ve simply added a second server so we can have a dedicated front end server to run Visual Studio 2012.
We mount the .iso using Windows now so there’s no need for a separate program for that. We right-click on the Visual Studio .exe and select Run as Administrator.
Agree to the licence terms and click Next.
Here, it gives you the opportunity to install some number of components. We check them all and click Install.
Now, there’s two progress bars and instead of a spinning pinwheel, we get little flying dots that back up and then speed off like traffic on the interstate. At least the two status bars are grammatically congruent, one being Acquiring and the other Applying.
Then you get a Setup Successful panel which is nice because it has the exclamation point and we like those a lot!
We click the Launch option and cross our fingers.
So here, the “Program Compatibility Assistant” tells us This program has compatibility issues. We click the Get Help Online option just to see what it will do.
That returns a No solutions found for Visual Studio 2012 so we click OK, then Run the program without getting help. It doesn’t instill a lot of confidence but, hey, it says it will run.
Sure enough, we get the Choose Default Environment Settings, and we select Visual C# Development Settings, forego the local help documentation and click Start Visual Studio.
Again with the Compatibility Assistant we run the program without getting help.
More progress bars for a couple of minutes… and there’s the Start Page and a baloon suggesting we try the updates. We click the update button for the Visual Studio 2012 Update 2. That brings up a download manager where we click Run.
The update says to close Visual Studio. We do and click Continue, Agree, and Install.
More progress bars and flying dot traffic jams. Again Setup Successful and again, Launch this time with no Program Compatibility Assistant. That’s cool.
And we have the VS2012 Start Page.
And if we need any greater detail, our new best friend, CannonFodder, has this for us to work through the entire process.
What we don’t have is the SharePoint 2013 templates. Those are here.
As our new best friend, Tim, explains here, we can download it and run the .exe.
As it turns out, Office 2013 is a bit of a prerequisite for the SP 2013 SDK as much of it will fail without it. Now we could figure out how to get the SP templates without Office 2013 but ain’t nobody got time for that so we just install the Office bits and try again.
So then we can turn to our new best friends at SharePoint 2013 Hosting who details the web part creation process here. We follow along creating the project and defining the deployment site and the template solution gives us an error “Unable to connect to SharePoint Server.”
This turned out to be an ugly issue with the SharePoint 2013 Distributed Caching Service and the Windows Application Fabric Caching. So what we did was generate a number of links to external source that essentially led us to reinstall the AppFabricCaching service on both SP front ends this time using the latest version 1.1 bits.
Here are some helpful links:
App Fabric Intro
APP Fabric Caching – Automated
App Fabric Permissions
Lead Hosts and Cluster Management
Distributed Cache in SP2013
App Fabric Overview This one might be the best.
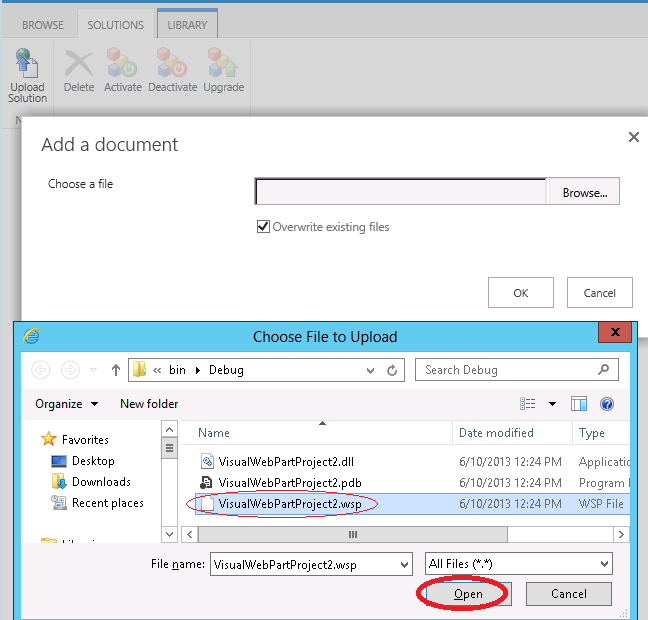
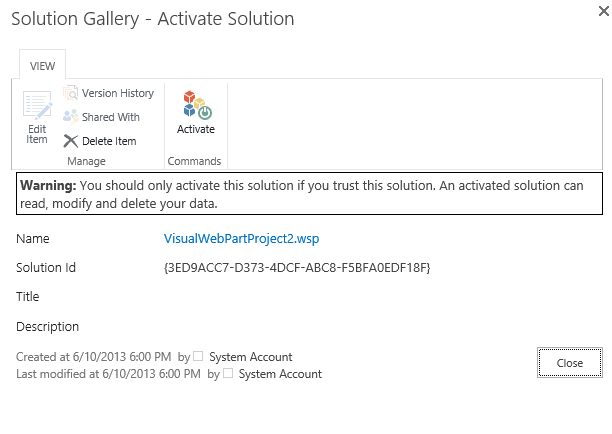
So after we got that sorted out, we figured out we had to start the Sandboxed Code Service on our development server. We would click the startbutton and Visual Studio would build our web part and install it in the specified site. Once there, we’d have to open a browser and navigate to the specificed site, edit the page and add the web part.
It looks like this:
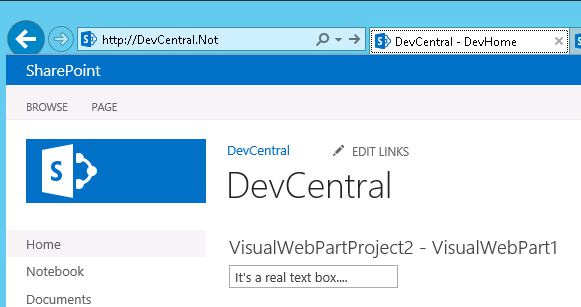
And there you have it, a custom SharePoint 2013 web part on a development server attached to a multi-server SharePoint farm.
hth
-robot