Okay, maybe you didn’t know. This robot is now the soon-to-be leading, local expert on large scale Microsoft Dynamics CRM installations.
In this case, we’re deploying many, many “intances” of DCRM for a number of development teams, test teams, validation teams, disaster recovery and production.
DR and PROD were cake… Four DCRM servers pointing to a single SQL Server and the VMWare backup mirrors the volumes in real time accordingly.
However, project managers and account managers being what they are, got all worked up about cost and money and induced us to agree to install a single SQL Server to support a number (say 1 .. n) of pairs of DEVx and TESTx DCRM environments where a single SQL Server will run multiple database server instances allowing each DCRM environment to run on it’s own server and use its own database instance on the single SQL Server as shown:
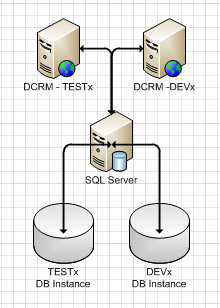
Multiple DCRM Servers Using Multiple Instances on a Single SQL Server
Perfect.
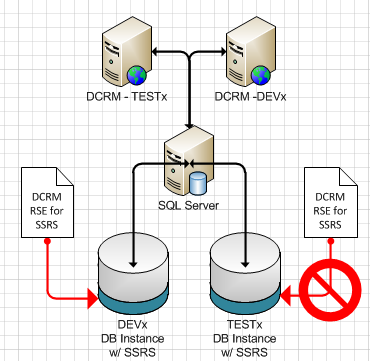
Well, you might think so but as we’ve learned, perfect is also often unobtrainable. It seems our friends at Microsoft, in the DCRM group, have tossed us a little bone called SQL Server Reporting Services Extenstions for Dynamics CRM. This is more stuff that you can add to SQL Server Reporting Services to make more spohisticated DCRM reports. Still, no problem. We simply add SQL Server Reporting Services to each of the database instances as shown where SSRS is the little blue piece added at the bottom of the SQL Server database instances:
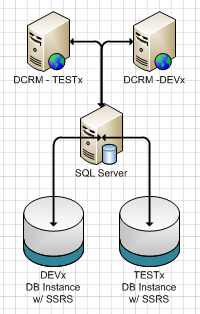
Multiple Instances of SQL Server w\ SSRS Added
And then we add our little DCRM Extensions for SSRS get added to SSRS, no problem as shown with the red arrows:
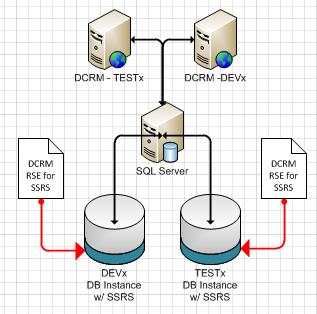
Adding DCRM RS Extensions to Multiple Instances of SSRS
Okay, well, sure… the first one goes in no problem. The second one, however, no so much…
It seems the setup program for DCRM RSE for SSRS notices that it’s already been installed and falls into a “Repair or Delete” routine that will not allow for the specification of the reporting services second database server instance:
DCRM RSE for SSRS Setup Program Bars Installation onto Second Instance of SSRS
So, what do we do? Well, you know me and this robot is all about making new friends. And our new friend, AniMandel from xrmadventures.wordpress.com, gives us a pretty good look at the DCRM RSE for SSRS setep process [HERE]. Yeah, he’s a little off topic but at least he has the screen shots.
Then, we have another new friend, Sean from Blogs.MSDN.com who dives into some the DCRM RSE details [HERE]. Sean says the magic words: “each Reporting server.. with the report extensions installed may only host reports for a single CRM 2011.” There you have it; we simply must have a dedicated instance of SQL Server Reporting Services for each instance of DCRM.
So what is this “dedicated instance of SQL Server Reporting Services” look like? We, we see at TechNet, [HERE], that it’s not really SQL Server; it’s the Install But Do Not Configure Option. It’s laid out like this:
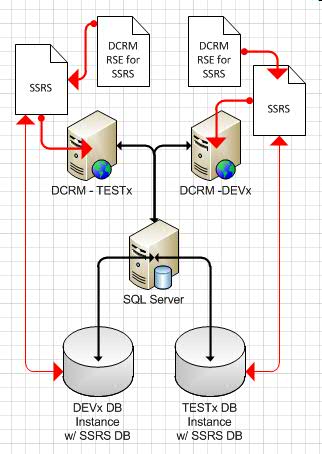
Multiple Instances of SSRS and DCRM RSE
Installed on DCRM Servers Using “Remote” Database
Technically, they call this “installing SSRS to run on a remote DB engine instance.” So we log into our DCRM server and run the SQL Server setup program. And, since it matters now, we recall that SQL Server components on separate server must be running the same version of SQL Server. So we check our version number on our DB engine instance, the blue cylinder above and we’ll be sure we install the same version for SSRS bits on our DCRM server. Once we mount the right .iso, we run setup.exe.
We run a new “stand-alone” installation, run the rules check, enter the product key, agree to the license terms, download and install the required updates and extract and install the setup program.
When you’ve installed all the setup and run all the rules, you select a “Features” installation and the only feature you select is SSRS – Native mode. Then you’ll run some more rules and add in your service account and password.
Then you’ll get to the Reporting Service Configuration and your only option here will be Install Only. Do what you want with error reporting and run some more rules. You get Ready to install and let her rip. The installation process runs for a bit and then you get a Success message. Not a bad idea to reboot here.
Now we can configure SSRS and tell it to use the database engine on our remtote SQL Server. We run the SSRS Configuration Manager and note how it’s a little different from a typical install. First, it still wants to connect to an “Instance” even though that instance is just SSRS and does not include the DB engine. Then, as you click down the configuration options on the left, you’ll see that the Service account is fine but the Web Service URL is a little different. it says the SSRS “Web Services is (sic) not configured.” We note that the Virtual directory and IP address and stuff is all okay but we may have trouble with the TCP port. In this particular case, perhaps by dumb luck, we put the DCRM web apps on port 5558 so port 80 is free. We don’t have any SSL requirements yet so I click Apply.
This yeilds a positive result so we press on.
The database section is even less comforting; there’s nothing there to work with so we have to add it all. When we click Change Database.
We get a configuration wizard to open and leave the “Create a new..” option checked and click Next.
Now we need to specify a database server. Accordingly, we specify the SSRS DB Instance shown above using the <Server>\<Instance> format. We select the SQL Server Account and give it a suitable acocunt and password. I used the sa account so shoot me. I click Test Connection and I get a success message. I click Next.
It want a database name and I’ll have a couple so I’m calling this one DEV1ReportServer so my other one can be TEST1ReportServer and I like English so I click Next.
Now it wants a service account and I have one for the local machine so I’ll use it and click Next. I like this because the DCRM service account is already listed as the “Service Account” and it says “Permission to aaccess this report server will be automatically granted to this account you specify.”
I get a summary and I hold my nose and jump in…
I get a big long list of succcesses and I click Finish.
I look at the Report Manager URL page. Blah, blah, blah, not configured… Apply… Success.
I don’t need an execution account at this point or encryption keys so I’m going to call it done. All I need, now is for the DCRM SRS Extensions setup to run against this DB instance…
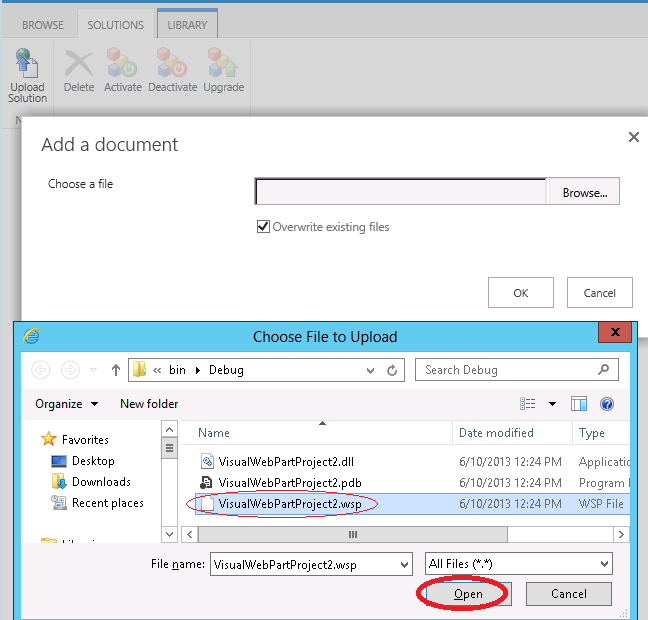
We drill into the install package and run SetupSrsConector.exe, accept the licence and forgo the updates.
In the Setup Wizard, on the Specify Configuration Database Server page, we point the extensions at the DCRM database that stores the configuration database; that’s the DEVx DB Instance in the diagram above.
Then, for the SSRS Instance, we point the wizard at the local SSRS instance we just created.
Do what you want with MS Update and point the install files at the correct location and click Next.
So it runs its “System Checks.” and we get a warning and an error. The warning arises from the fact that we created the default organizaation to run SSRS on the old dedicated instance where we orginally wanted to share SSRS. It just means that the RSEs won’t work on that organization. We’ll just delete it and make a new one.
The errors comes from the fact that DCRM and SSRS on the DCRM server are using the same service account. It says to go into the Services.msc and change the account on the SSRS service and restart the service. I do that, click back and then Next again.
And we couldn’t get past this error without resorting to this: http://inogic.blogspot.com/2012_06_01_archive.html
hth!
-robot