Archive for the Category Install


Some Notes Re: SharePoint 2010 User Profile Synch Service

So there’s a lot been said about the User Profile Synchronization Server in SharePoint 2010.

Let’s take a minute to point out a couple of interesting points.

First, returning as our new best friend in Harbar his Rational Guide to the UPSS. So we’re not going to try to improve upon or replace any of that except as follows.

Once we’ve deployed our two server farm in a friendly domain, we’re going to run the Configuration Wizard in Central Admin. Now that will do a lot of things but it won’t get the UPSS running.

So we visit Services on Server and we’ll see:

Fig. 1: Services on Server

So, we click Start and it changes to  Starting for a minute but then you refresh and it’s gone back to Stopped.

Also, we go to the Manage Service Applications, which is different from Service on Server, by selecting Application Management | Manage Service Applications and clicking on the User Profile Service link:

Fig. 2: User Profile Service Management Link

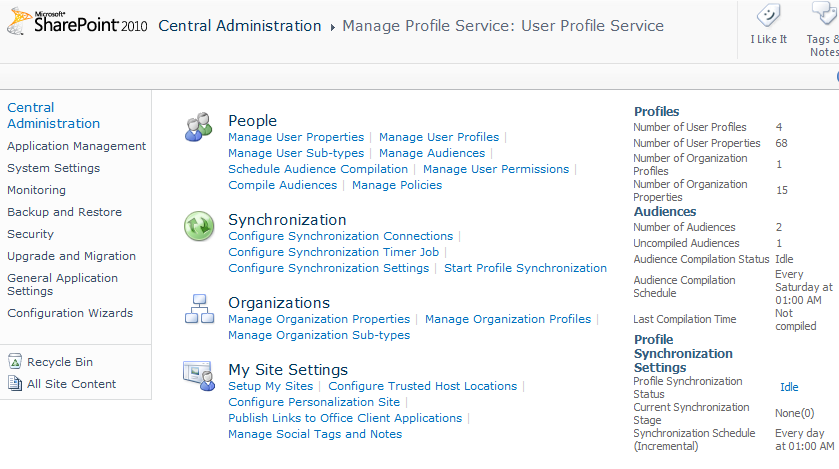
… where we find the <hidden> Manage Profile Service: User Profile Service page:

Fig. 3: Manage Profile Service

Here, we try to Configure Synchronization Connection and Create New Connection and SharePoint barfs saying it can’t load the page because the profile service is running or not running or something.

So here’s what’s happened. When we ran CA’s configuration wizard, it tried but failed to initiate the UPSS and left it hung and it hung for a couple of reasons and left some splat files in various places that we have to fix.

First, we have to stop the service that’s trying it’s best to run. This is a SharePoint Management Shell (i.e. PowerShell) task.

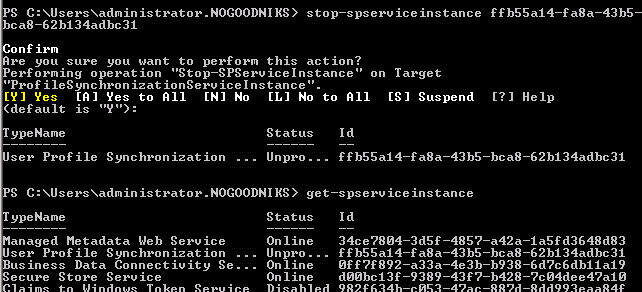
We run Get-SPService and see that the service is, in fact, online:

Fig. 4: Get-SPServiceInstance

We get the GUID and run Stop-SPService Instance <GUID>

Fig. 5: Stop-SPServiceInstance

… and it takes a moment to “Unprovision” itself.

Then, it’s Disabled.

Fig. 6: UPSS Disabled

Now we can do a couple of things.

First, we can go delete the certificates it created with that bad GUID by running MMC and loading the Certificates Snap-in. Now, we’ll have to do this for the local computer and for the logged-in user, but we drill down to all the certificate stores and everywhere we find a ForeFront certificate, we’ll delete it.

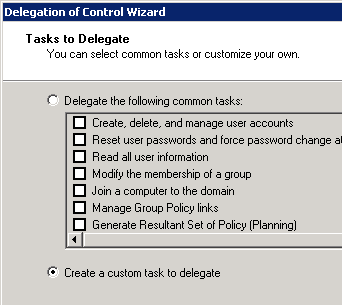
Then we’ll go into Active Directory and right-click on our domain and select Delegate Control. Here we run through the wizard, select our service account and then select the Create a Custom Task option:

Fig. 7: Create a Custom Task

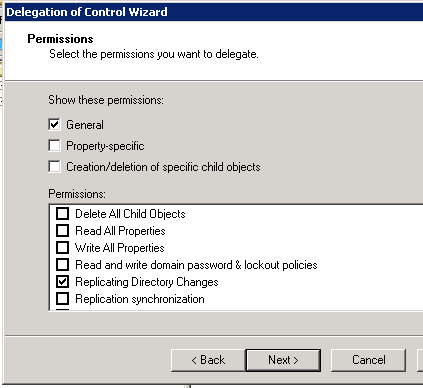
… Then, on the Permissions page, I check the Replicate Directory Changes permission:

Fig. 8: Replicating Directory Changes

Then finish the wizard.

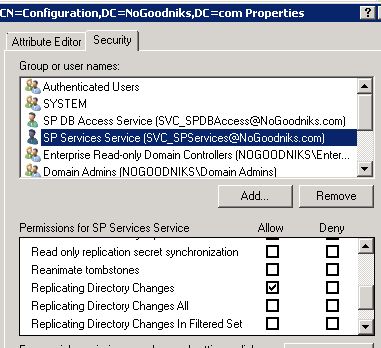
Lastly we run ADSIEdit.msc on the domain controller. Here, we’ll connect the root to a Well Know Naming Context called Configuration. Then, we’ll right-click on the configuration and select Properties.

On the Security tab, we’ll add our service account and give it the Replicating Directory Changes permission:

Fig. 10: Replicating Directory Changes Permission

Then we’re done with that, we can start our UPSS and create our connection.

hth

-robot

Unable to Authenticate to Local Site? Disable Loopback Check

This one never gets old. Everytime we want to install SharePoint, we tend to continue to work on the server getting as much done as possible. And, everytime, we’re confronted with the inability to authenticate using Windows username and password and a browser on the web front end server.

You try so carefully to enter your DomainName\UserName and password exactly correctly and hit enter, enter, enter and you get a 401 or, worse, just a blank screen. As we’ve learned, what we’ve encountered is the dreaded anti-loopback monster.

Now, the ALM is a fine security measure on a server that you deploy and then spend the rest of your life as a SharePoint admin working from another workstation. It simply prevents authentication from the local machine using host headers other than the machine name. It’s detailed here on support.microsoft.com. Apparetly the threat is a “Reflection Attack” which reminds me of my mirror on the occasional Sunday morning before my shower.

Essentially, we’re creating a two registry keys:

  1. DisableLoopbackCheck dword registry key with a decimal value of 1 in the HKLM\SYSTEM\CurrrentControlSet\Control\Lsa hive. 
  2. DisableStrictNameChecking dword registry key with a decimal value of 1 in the HKLM\SYSTEM\CurrrentControlSet\Services\
    LanMan
    Server\Parameters hive.

Once we restart, we should be able to access our sites locally using the propery credentials. Of course, this is a “must have” kind of thing if you’re building a development box where you’ll be accessing the WFE from the local machine in Visual Studio.

hth
-robot

Windows PowerShell and the SharePoint Management Shell

If you’re an expert at this then you’re ahead of me here. My new install of Server 2008 R2 includes a Windows PowerShell (WPS) and my SharePoint install includes a SharePoint Management Shell (SMS).

I found this on MSDN where they explain that SMS is just WPS with the SharePoint PowerShell snap-in added. Also, this is part of the move away from the Shared Service Provider to a more generic Service Application Framework that will support all of Office 14. Here, we can see that Microsoft claims this approach will improve development, integration, load balancing, authentication and back-up\restore.

There’s also a discussion of the PowerShell and SharePoint Foundation here where you’ll find links to the beginner guides for WPS.

I also found the help file for the SMS Cmdlets here. This page is labeled for the Search Server 2010 Express but the SharePoint 2010 Beta commands are included in the third of the three help files listed.

Finally, our new best friend David explains here that cmdlets can be written into a .psl file and run from the PS> prompt as well as where to find your $profile so you can add the SharePoint cmdlets into your generic PowerShell environment.

-robot

SharePoint 2010 Creating Web Applications pt. 2

SharePoint 2010 provides a number of ways to create a new web application. We looked at the instructions on TechNet here.

Yesterday, we created a new web app using the pages in Central Admin and a non-standard port number. The TechNet page tells us we can use the new SharePoint Management Shell (SMS) application that is intended to replace stsadmin.exe. It’s available on the server under Start | Programs | SharePoint 2010 Products | SharePoint Management Shell.

TechNet also tells us the SMS command to create a new web app is:

New-SPWebApplication -ApplicationPool <Name of the application pool>
-Name <Name of the new Web application>
[-Port<Port on which the Web application can be accessed>]
[-HostHeader<Valid URL assigned to the Web application that must correlate
to the alternate access mapping configuration>]
[-URL<Load-balanced URL for the Web application>]
[-ApplicationPoolAccount<User account that this application pool will run as>]

So I composed mine like this:

New-SPWebApplication
-Name "Contoso Internet Site"
-Port 80
-HostHeader http://sharepoint.contoso.com
-URL https://www.contoso.com
-ApplicationPool ContosoAppPool
-ApplicationPoolAccount (Get-SPManagedAccount MyServer\Administrator)

And, obviously, we need to look into managed accounts in a little more detail because the error is:

Get-SPManagedAccount : No matching accounts were found.

In fact, I’m not sure I know what a managed account is.

For my money, no one explains it better than our new best friend Furuknap here. Furuknap tells us that SharePoint 2010 can take over the management of the password of accounts used as application pool IDs. This is convenient because every IIS web site will refer to an app pool and every app pool refers to an ID. When these scale out, managing the passwords can be difficult, particularly when they expire. This new SharePoint 2010 feature eliminates this headache.

So we need a managed account for our SMS create web app script to work.

So we go into Central Admin and visit the Security page. Here, there’s a linkgroup for General Security. I click Configure Managed Accounts.

There’s a Register Managed Account link at the top. I click it and enter an account I made earlier for this purpose MyServer\ManagedAccount. Furuknap explains the benefits of letting SharePoint now support your password requirement but I leave them blank all the same.

Now, I return to my SMS session and change my command to reflect the new managed account. I press Enter and it runs and runs and returns some output indicating my Site name and URL. I enter the URL in my browser and press Enter. It runs for a second and prompts me for a user name and password.

I try the only accounts on the machine: The Administrator account and the managed account. Neither works.

So I tracked down some input on Technet here. They pointed me to the KB article here talking about the trackback loops when trying to hit web sites on the local server with non-standard host headers.

-robot

Creating SPS 2010 Web Applications

I tried one yesterday but after it finished, it wouldn’ t let me log ono it.

So today, I’ve gone out and found this on Technet.

Now, like any good robot, there’s nothing I like more than following good instructions nor less, bad. So here goes.

Now the Technet page is good in that it sets some expecations. Our new web application will have it’s own database and when we create it, we’ll need to specify an anthenication type, Classic (Windows) or Claim-Based (Windows or Form Based.) Also, it points out that the new PowerShell environment will let you create web apps programatically so we’ll have to get a good look at that later.

So, Central Administration has an Application Management page where there’s a link to the Manage Web Applications page:

../_admin/webapplicationlist.aspx. 

Here, there’s a New link on the ribbon. This loads a Create New Web Application page:

../admin/extendvs.aspx.

Now a note here. My CA web site actually loads this page in a dialog box centered over the shaded page. When I right click on it I can see the properties and get the URL for the dialog box:

http://myserver:<myCAPortNumber>/_admin/extendvs.aspx?IsDlg=1

The ?IsDlg=1 query string is what makes it the shaded dialog; if you delete the query string, the page will load in the browser window without the shading effect.

Following TechNet’s instructions, I select Classic Mode authentication and Create New IIS Web Site.  I leave the website name unchanged. The host header value is optional. I’ve always preferred to route to web sites using the host header but for this first attempt, I’ll leave it blank.

I leave the default website path unchanged. I’m also going to leave the authentication method as NTLM. At this point I’m checking Yes for Allow Anonymous. TechNet tells us this is required if you want any content to be accessible anonymously and, later, you can restrict anonymous access. This cannot be changed later.

I am not going to use SSL and I’m going to leave the default URL and zone unchanged.

I’m going to use an existing application pool, the same on I’m using for my existing site.  I dot the option and pull down the list and select SharePoint – 80 (Network Service). The option to create a new one will also let you create a new managed account by opening up a new window. I may try that later.

It gives me default database server and name. The name has a GUID suffix. I usually change it to something more easily deciphered like the port number of web app name used above. I leave the default Windows Authentication unchanged in the database authentication section.

At this point, I don’t have a failover database server and, I presume since I’m a stand alone inststallation, I don’t get to select a search server; it simply says that search is provided by SharePoint Server Search.

Next, we have a new Service Application Selection section. This can be default or custom. If we select custom, we can selectfrom the list of available services. I’m leaving the default value unchanged.

Lastly, we have some ugliness about the Customer Experience Improvement Program. I’m going to leave it as No and click OK. The dialog box indicates that it’s Processing and shows me an orbiting ball. Then I get a dialog box that says Web Application Created with a link about forms based authentication configurations and another to Create Site Collection.

I click Create Site Collection and end up at:

../_admin/CreateSite.aspx?WebApplicationID=<GUID>

and I get the &IsDlg=1 query string as well. I give it a name and make myself the owner. I leave the rest unchanged and click OK.  

The dialog box says the top-level site is created and gives me a link. I click it.

I end up with a new site called Home and it got a great picure of some new dorks.

So what did we miss? First, there’s alternative authentication options. We could look at creating new Application Pools and then there’s the PowerShell options. We’ll look at those next.

-robot